Tuesday, July 30, 2013

How I learned to decorate cakes...

Recently, I received an email from someone asking how I learned to decorate cakes (specifically asking if I learned everything from Craftsy) and if I had any advice.  My response turned fairly epic, because I wanted to be thorough... so I decided there might be other readers looking for advice!  So below is my response!

I've been baking all of my life.  My mom never baked, so I taught myself out of her cookbooks, and we had a friend of the family who liked to bake so I baked with her a lot.  When I was little I would make cakes for my family member's birthdays and decorated them with the start tipped-type patterns (press a cookie cutter into the frosting and fill in with little stars)... when I got a little older I found a recipe for marshmallow fondant, learned how to make it and would decorate cakes with simple cut-outs...  When my cousin got pregnant, her sister asked me to make the shower cake "with her" and it was a pregnant belly cake.  It was the biggest project I'd done and it came out pretty good!  That's when my cousin suggested I take my cake making a little more seriously.

I did a lot of research online, home with an infant, I had a lot of time on my hands!  There are some great resources- Cake Central, YouTube... they were my most valuable resources at first.  Craftsy has only been around for about a year and a half- maybe two years now... so yes, I was already experienced with cake decorating before I took any Craftsy classes.  I've taken the classes to learn specific techniques, or just to see how some of the cake decorators I admire do things.  I think there are some great classes for beginners... even if you don't want/need to make the entire cake they demonstrate you can take away specific techniques you will use over and over again.
If you want to get into cake decorating my recommendations are:
  1. If you are not already a baker, learn to bake!  When I started decorating I used boxed mixes, you can look up "WASC" recipe for a great "doctored" recipe.  However, they changed their formulas and when I started my business I had to think about labels... I didn't want to list a bunch of weird ingredients and chemicals, so I researched, experimented and came up with my scratch recipes.  Either way, it's up to you, but you should have something reliable that tastes great!
  2.  Learn to get smooth buttercream...  there are videos on YouTube (I have one for how to smooth Swiss Meringue Buttercream) and tutorials all over the internet.  But, you should find a technique that suits your icing recipe and practice until you have it perfected.  It's one of the things that will make the biggest difference in your finished cake.  You can have a cake embellished beautifully, but if the "canvas" behind it is bumpy and lumpy there is nothing you can do to hide it.  Of course, it takes time to be able to get that perfect finish, but it's important to learn it and not rush past it to other decorating techniques.  Even if you are going to cover the cake with fondant, you need smooth buttercream because fondant will only enhance imperfections in the buttercream finish.
  3. If you want to make fondant cakes, learn to cover a cake with fondant!  And learn to smooth it properly.... again, it takes time and practice to learn.
  4.  Once you can get a nice smooth buttercream and/or fondant surface then expand on to other techniques...
  • Craftsy: I wouldn't bother with Craftsy until you can do that, they don't really teach it.  You can take a free class called "Modern Buttercream" that will teach you to make a recipe for Swiss Meringue Buttercream and teach some simple decorating tips...  Or a "Basic Fondant Techniques" class.  These would be a great way to get an idea of what Craftsy is all about. They also have some great free recipes posted!
  • Cake Central:  Cake Central has been an invaluable resource for me.  They have tons of free recipe posted, with user reviews so you can decide which ones to try.  Galleries with beautiful cakes for inspiration.  But, probably most valuable are the forums....  There are threads upon threads with tips for cake decorating.  Check out some of the "stickies" in the "How do I?" forum, for plenty of links to online tutorials.
  • YouTube: I joke with my family that you can become a surgeon from YouTube.  It is a wealth of information for just about anything you want to learn!  Even before I found Cake Central I was watching YouTube videos about cake decorating.  It's my first stop for anything I don't know how to do (and not just cake decorating, changing a headlight, plumbing problems, carpentry projects, etc...)
  • Pinterest:  When I started we didn't have Pinterest, but now I think it would be really useful.  People all over "pin" ideas and tutorials for cake decorating.
  • Books & Videos:  My library didn't have a huge selection, but a lot of others do.  Look up any book you can about cake decorating and absorb the knowledge! "The Cake Bible" by Rose Levy Beranbaum is probably one of the most famous and most thorough resources for learning to bake.  As far as recipe books, I'm a huge fan of "Cake Love" by Warren Brown.  Sharon Zambito, owner of Sugar Ed Productions produces some really great quality instructional videos.  I have not seen them, but many decorators swear by them!
  • Online Memberships:  Popping up all over are membership websites that give you access to tips, tutorials and recipes.  My Cake School is probably one of the longest running ones, and I've seen many new and innovative techniques come from there.  And coming soon, maybe even up already is Sharon Zambito's new cake school SugarEd Productions Sugar Art School (I will definitely be signing up!!).
  • Experimentation:  Don't be afraid to experiment... a lot of the techniques I learned, I had to figure out on my own.  That's how this field stays new and refreshing.  Most of the time you will design cakes with different applications of the same techniques... but then someone will want to achieve something new and new technique is born.  One of the things I'm most proud of is my Cinderella Slipper... I really wanted it to be sugar so it wold look like glass... but I had never worked with isomalt before and I couldn't find any tutorials.  So I experimented!  And it worked... I was even asked to make the tutorial for SugarEd Productions (Sharon emailed me herself!).
  • In Person Classes:  A lot of the "masters" travel all over to teach.  There are ICES conventions, seminars at cake shows, and even just private classes offered all over.  Find a "master" you admire and check out their website to see if they will be instructing anywhere near you.  There are also the Wilton classes offered at most crafts stores.  I've never taken one, but if you need to learn the basics, a lot of cake decorators start there.
If, after practice, you think you want to make your hobby a business.  First do your market research and put together a business plan so you will be fully prepared and know if you have a market for your products.  Then you will need to look into your local rules and regulations.  Some areas have cottage food laws that allow you to produce from your home.  Some areas require you to find a separate commercial kitchen to work from.  When you're ready reach out to your local health department to find out what you need to do.

And "is it a big investment?"  Well, that's tough... it depends on how far/involved you want to get.  Does it cost ME a lot... honestly, yes.   I'm still a new business and there are still lots of tools I don't have.  It CAN be very costly.  But, a lot of us do our best to utilize what we already have when designing cakes.  You can start small, especially if you are just a hobby baker.  Get a set of pans, some spatulas, a turn table and some pastry tips.  I didn't start out with the large collection of tools I have, but I buy new things as I need them.  Making custom cakes is not cheap, that is why it costs so much.  Ingredients aren't cheap, tools aren't cheap and most importantly the time we put into learning and decorating isn't cheap!  That's probably not what you were hoping to hear, but so many people don't realize the costs and time involved in making cakes.  I don't mean to scare you off... if you are just starting out and learning the basics it won't cost you much.  But, if you ever set out to make cake decorating a legitimate business, be prepared that there is some investment.  On top of all of your tools, ingredients and your time you have your license fees, business insurance and overhead.  I rent my kitchen by the hour, but even if you are able to bake from home under cottage food law you have added costs for electricity, gas, water, etc...

Well, I hope that gives you an idea of how I got here, and where to start if you want to get into cake decorating!

Happy Caking :)

Wednesday, July 24, 2013

Lace Applique Cake

Today, I have another cake from my photo shoot with Allure Bridals, to share!

For this "story" I was sent a photo of a pretty lace covered green bridesmaid dress.  I've been wanting to make a lace embellished cake for a while now, so I knew lace that would be the focus of my design!
 Now, I just had to find the right lace to use!  I ordered a few from cake supply stores, but they weren't "real" enough looking.  I considered doing a brushed embroidery lace design... but knew I didn't have the time.  So, that only left me with one options... to make my own lace mold.
 
Off to the fabric store to find some lace...  In my area of New Hampshire we don't have a lot of big fabric stores...  On one of my trips back to my home state of Connecticut I stopped in to a giant Joann-Fabrics and searched the entire store until I found a small display of lace appliques!  I finally found something I thought would work!!

To make the mold, I used a technique similar to one I saw in the Craftsy class Cake Design Made Simple: The Wedding Dress with Rachel Teufel.  But, I modified the process a little so I had more of a mold instead of just a lace press.... either way, it still meant hours of hand cutting around each applique!!
The inspiration dresses were more structured and less flowy... so I added a structured pleated band around one of the top tiers.  I was tempted to add a bow... because I think everything is pretty with a bow... But, thought it wouldn't fit with the look I was after.
Fresh flowers were added to the top when the photographed this cake... but I wasn't there for the 2nd day of this 2 day photo shoot, so I don't have pictures.  Rest assured, I will definitely share the finished photos when they are published!
 Thanks for checking out my work!  Take a look at the gorgeous table that my friend, Meena of 5th Avenue Weddings & Events created for this story!


I know... amazing, right?  If you need a fantastic and creative wedding coordinator, look her up!  She's in the New York area, but she travels!!

Happy Caking :)

Tuesday, July 23, 2013

Buttercream Swirls

So, this past weekend's cake was a simple buttercream cake:
It was pretty basic, with SMBC finish and swirls.  Fresh flowers, provided by the florist as embellishment...  My clients tend to come to me when they want fondant work.  I somewhat specialize in fondant design with clean, elegant lines (or, so I like to think, lol!).  So, it was refreshing to have this "easy" little order. 

But, you know what they say... the easy ones tend to give you the most trouble!  Back when I booked this cake in February/March, it was cold out.  When I was told it was going to be a buttercream cake in August, absolutely no fondant... I asked the big question, where will the cake be displayed?  Inside, out of the sun, it's pretty cool in there, they always put the cakes there... Okay, it was cold outside, I wasn't in a "summer heat" frame of mind at that point.

Cut to last week when I'm trying to make this "simple" cake and we were in a 100°F heat wave here in New England!  Eeeek!  Not good for Swiss Meringue Buttercream!  It was so difficult to get the cake smooth, difficult to pipe scroll work while fighting the icing melting in my "hot hands."  But I persevered and pulled it off!

Okay, time to deliver the cake!  This made me glad I had put so much thought into my summer cake deilveries!  I think I am going to make a video (during all that free time I have between the hours of 3am and 7am!) with my tips for summer cake deliveries!  But, my saving grace for this sweltering delivery was dry ice!  I packed the cake in a double thick, heavy duty cardboard box and put in some dry ice.  Cranked the AC and drove 2 hours to the venue in a refrigerated SUV, lol!  The cake made it there in one piece and even though the room was hot, the cake held up! 

*For those of you who are wondering about using SMBC in hot weather, I still do not recommend it!  The heat had begun to break on the day of this delivery, the reception was in the evening and the outside temp was going down.  The room was very warm, but still only in the lower 80's by the time I delivered the cake.  If it had been up in the 90's-100's, I would have asked the caterer to keep it refrigerated as long as possible.

So, there you have it... Happy Cakes by Renee does buttercream cakes too, no biggie!

I know this isn't a very exciting post, and I didn't have a ton of pictures of this cake... so, later this week I will share photos of another cake from my photo shoot with Allure Bridals!

Happy Caking :)

Tuesday, July 16, 2013

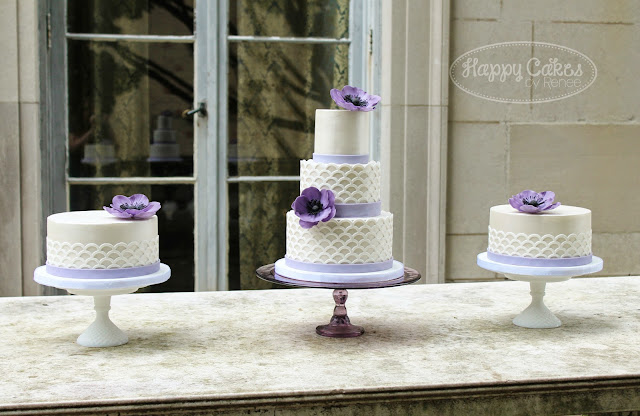
Purple Anemone & Scalloped Lattice Cake!

Last week, I had the honor of participating in something so exciting and fun!  I was invited by a friend, Meena of 5th Avenue Weddings & Events to participate in a photo shoot she was doing for Allure Bridals

.....What?! 

Yes, that's right.... I was asked to provide cakes, to be photographed and used in a new marketing campaign for the 2014 collection of a bridal gown company!  Right, smack, in the middle of wedding season!  But, I couldn't say, no!

At first, I thought I was just providing one cake... but nope... After committing to the project, we found out that they wanted to shoot 5 different "stories."  With just two weeks notice, there was not way I was going have time to design, order supplies and execute FIVE different cakes!  So, I said I could do 2 different detailed cakes... And, one plain white 3-tier cake that we could dress up for the other 3 stories....

Today, I'm excited to share the first of the cakes that were photographed!  The table, styled by Meena, for this story had beautiful purples to to with the bridesmaid dresses that were photographed.  I designed this cake, fairly simply, with a purple color palate.

The tiers were painted with super pearl, to look like satin.  The contrasting scalloped pattern is a matte white (textured with tulle), created with one of the new Onlays by Marvelous Molds- the "Scalloped Lattice" pattern.  I LOVE this new product, it makes decorating so easy and quick.... and with the little time I had to pull off these cakes, I needed fast and easy!

I did a petite trio of cakes for this set up... we were shooting at an abandoned mansion and set up on this beautiful sculpted table!
 
I used simple purple Anemones as accent... But, the beauty of this simple design is the differences in texture and with the delicate, lace-like scalloped pattern.


A photograph... of my cakes being photographed!  So surreal!!!
 I'll be posting photos of some of the other cakes I created soon!  For now....

Happy Caking :)

Wednesday, July 3, 2013

New Product: Marvelous Molds Onlays!

Hi Everyone!  I wanted to tell everyone about this new product from Marvelous Molds!  I was lucky enough to receive several of the new Onlays to try out.  Jackie from Cake Central reached out to me, to see if I would be interested in trying this brand new product from Marvelous Molds.  I had no idea, at the time, what exactly the product was... but I did know that I'm a huge fan of the company and anything they were coming up with was sure to be innovative and fun!  I was going to be short on time for their deadline, but of course I said I would make it work!  Sadly, my cake did not make the cut for the contest over on Cake Central... but I'm a big enough person to admit that the contestants chosen are way better than what I came up with.  I voted for my favorite!  I encourage you to go check out the gorgeous creations!

Anyway... back to what I think of the Silicone Onlays.  You've probably inferred already, that I'm a fan, lol! But, what I'm not sure I can convey to you is how wonderfully easy they are to use and how helpful this new tool is going to be in the future of cake decorating!  I'm sure we've all stenciled patterns on cake... you have to wrangle the stencil with one hand, while trying to scrape on some royal icing (or buttercream with the other).  Some inevitably squishes under the stencil and you have to go back and touch up... then completely wash and dry the stencil before continuing with the pattern.  Or maybe, just think for a minute, how many hours we have spent painstakingly hand cutting a repeating pattern!

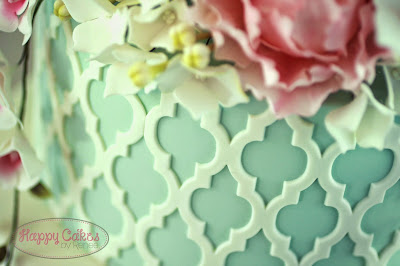
Well, Marvelous Molds' Onlays make such fast and neat work of getting patterns on a cake.  Excitedly, I received the "Moroccan Lattice" Onlay, as part of my package.  This beautiful pattern is really on trend right now, and I've been interested in making a cake incorporating the design, for quite a while now.  I looked everywhere for a cutter, only recently have Marina Sousa's "Quatrefoil" cutters been available....  So, when I received my package I immediately knew I wanted to use that as the focal design on my cake.  I had so many ideas... but the one I felt I had time to pull off was a garden-y, vintage looking cake.

When it came time to use the Onlay, I was a little nervous, not having practiced too much with them... but they were incredibly easy to use!  And so, so quick!  I got the entire 8" round completed in 10-15 minutes, including rolling out the fondant!  For comparison, just 2 days later I spend an hour to hand cut, then another 45 minutes to place the "double wedding rings" pattern on a client order.  They even do have an Onlay for that pattern, too bad I would not have received it on time!

Basically, the new Marvelous Molds Onlays, are everything they claim to be.  They work just like in the instructional video on their website.  They are quick and easy to use and provide flawless, clean results.  Ranging in price from $12 (for some of the ribbons) to $29 (for the larger all over patterns) I think these are a great value for money.  They will save hours in decorating time, are strong and durable and have a variety of universal patterns, sure to be used over and over again.

I hope you will check them out... or at least head over to Cake Central to see the wonderful cakes created for the Marvelous Mold sponsored contest!  Leslie Bruckman's art deco cake is jaw dropping!

Happy Caking :)


DISCLAIMER: Marvelous Molds, kindly sent me the product to try, but did not ask me to blog about them.  All opinions are my own.