Hi Everyone! I'm back with another video tutorial. This time I am demonstrating my technique for creating a quilted effect on cake. I've used this technique on several cakes now! I remember back to when I first had to do it.... I was confused and intimidated and only found hints of instruction, certainly no video tutorials! So, I figured I would show you all this basic decorating technique, it really is a beautiful effect.
If you look in to "how to create the quilted pattern" you will find some of the more popular or common ways to do it are to use a "Diamond Quilting Tool" (they come in a couple of other shapes as well), this tool looks just like a gumpaste cutter, it's 3 equal sized diamonds, one on top of the other. Another common tool you can find is a "Diamond Impression Mat" it's a clear mat with raised lines that create a diamond pattern when you press it onto your fondant.
Both of those tools work, and you can create a really beautiful cake with them. I'm not knocking them... but I don't own them, and don't see myself making the purchase. For a couple of reasons... One, you are limited to the size and shape of your quilting, each tool only makes one... And with the impression mat, the pattern distorts slightly when you stretch your fondant over your cake... With my method, you use the same simple tools to create virtually any size/shape (square or diamond) that you want.
My method does not require special tools (like a quilting tool or impression mat)! You can create this effect with items you probably have already at home.
All you need:
flexible cardboard (like a file folder or even a cereal box)
ruler
toothpick
stitching tool, wheel cutter, veiner or the back edge of a knife (something to gently emboss a line)
Click here to see the PME tool I use (it is widely available at cake supply retailers)
So, without further adieu, here is my video demonstrating the technique:
A few tips:
It is best to get started immediately after you cover your cake with fondant, when the surface is still soft and flexible, you don't want the fondant to crack, tear or cut all the way through
Use paper to play with different angles and spacing, you can use whatever combo will give you the exact results you want!
If you want a "puffier" look, let you icing (under the fondant) soften a bit and you can use a little more pressure without cutting through your fondant
Hi everyone! I've got another tutorial :) This is another request I've gotten a few times, how do I smooth my buttercream. There are loads of tutorials and instructions for smoothing American Buttercream, with the "Viva Paper Towel" method probably the most common... that's the method I use when I have to use American Buttercream. But, as much as I researched when I started working with Swiss Meringue Buttercream (SMBC), I haven't seen many demonstrations on smoothing it... so I thought I would make a video showing my technique.
One of the most common techniques you will read about is the "Hot Knife" method. The idea is you dip a spatula in hot water and dry it off. The heat from the spatula melts the butter in your buttercream and leaves a smooth surface. It works, that is the technique I used when I started... However, if you are not covering your cake with fondant you will see the discolored streaky-ness this method creates. Which is why, you will also read a lot of complaints about this method.
Another method, that I've found intriguing, but have not tried is called the "Upside Down" method. With this technique you spread an even layer of buttercream on a piece of parchment, then place your cake upside down on the parchment and ice the sides as usual and after you smooth the sides, invert the cake, you are left with sharp corners and a smooth surface.... I just don't have a lot of trouble getting the sharp corners and it seems like a few extra steps...
So, the way I smooth my cakes, is to simply scrape the cold and hardened buttercream with my offset spatula and bench scraper. Kind of just "shaving" off the imperfections, I do not use a hot knife, spatula or bench scraper. By working quickly and keeping the cake cold you can avoid any discoloration! Plus, you get the same, or better, results without the few extra, unnecessary steps. While I am using SMBC, this method should also work with any non-crusting, butter based buttercream, as long as it sets hard in the fridge.
So, here is a demonstration of how I ice and smooth my cakes!
I hope you find it helpful :) You can find the Swiss Meringue Buttercream recipe that I use here.
Hey everyone! So this week, I got to make a cake for one of my favorite people... my nephew is turning 4! He is such a "boy" and loves action movies and especially Transformers! So naturally, he had to have a Transformers cake for his birthday party. I can't wait to bring it to him!
The Bumblebee figure- I purchased. I looked at countless photo's to see if I could simplify it enough to try and model one... but it just wouldn't look as cool! If I had 2 weeks to work on just the figure, I might have been able to do it... but with my busy schedule, it just wasn't happening. Besides, now he'll have a toy to play with after the party. Besides, since this was not a "for sale" cake, and I purchased the toy I think I'm safe with any copyright issues.
Besides the toy, everything else (besides the wires in the stars and the straws in the cake- wires should not touch cake), is edible/fondant. I added disco dust to the black on the stars to make it a little sparkly.
I tried to make the top of the cake look like torn metal, like Bumblebee had just ripped through the top of the cake... I actually patted myself on the back on this one! I put a small circle of black fondant down on top of the cake before I rolled out/covered with the yellow fondant. Then, when I rolled out the yellow fondant, I added a small circle of black fondant to the underside and rolled it in... I dusted the black circle (already attached to the cake) with cornstarch so it wouldn't stick. Covered my cake as normal, making sure the black fondant I rolled to the underside of the yellow was appropriately placed... then after my fondant was smoothed, etc... I poked a small hole with a knife, and used my small scissors to cute back the fondant and make small cuts to make it look jagged. Then just shaped it a little. Voila, instant torn metal and no seems! I sprayed the black fondant with pearl spray (Americolor airbrush color) to make it look metallic. I impressed myself with the effect!
I cut the Autobot logo out of black fondant, and also sprayed those with the pearl spray. I though it would look cool to make it metallic instead of just flat black. It was tricky getting the pieces sprayed and on the cake with the color drying enough to handle and the black not so dry it would crack. I think it worked out OK, I got a few finger prints in a few spots, but brushed them to make it kind of look like beat-up metal. *I used piping gel for the writing, I didn't feel like mixing up a batch of royal icing (what I typically would use) just for the small amount I needed. The gel bled a little overnight in the fridge... oh, well... you live and you learn!
Overall, I am thrilled with this cake. I think it looks really cool... and even though I strayed from my mission to use only edible pieces on my cakes (for the sake of the toy), I think my nephew is going to be beyond happy with it!
I'm not sure if I had mentioned this in a previous post... but I am a self-taught baker/cake decorator. Much of what I've learned has come from YouTube, as well as other blogs and Cake Central. Well, it has been a while since I've browsed YouTube for new cake/baking tutorials. So I was thrilled the other day, when I discovered a great "new" YouTube channel called "Crumb Boss." They've been around since last January (I believe), I can't believe I hadn't found them sooner! The two women who make the videos (The Crumb Boss and Steph the Producer) are a riot! They have great introductory recipes for beginners as well as some very informative recipes for people looking to try something a little less basic (Zabaglione, anyone?). I highly recommend you check them out!
Okay, so my post is starting to sound like a review and endorsement for The Crumb Boss... but the real reason for this post is the cupcakes I made, inspired by their video "Chocolate Chip Cookie Dough Cupcakes!" The icing is what really makes this cupcake- an eggless cookie dough, mixed into her Swiss style buttercream. I've made a cookie dough filling before, but it was with an American buttercream that was much sweeter than I prefer my icings to be! I mix so many things into my Swiss Meringue Buttercream, I can't believe I hadn't thought of this. The Crumb Boss is brilliant!
So, when I had leftover vanilla batter from a cake I was working on, I mixed in some chocolate jimmies (or sprinkles) so my cupcakes would be chocolatey-chippety. I mixed up my eggless cookie dough, and I was about to mix up my buttercream as usual (recipe here), but then I was inspired... I still had my brown sugar out from the cookie dough... brown sugar is a key ingredient that gives chocolate chip cookie dough it's flavor. That's right! I substituted the granulated sugar in my recipe for brown sugar! It was a very subtle, yet yummy difference. Next time (and there will be a next time), I think I will try part, if not all, dark brown sugar to give it a more noticeable brown sugar flavor. As it was (with the light brown sugar) it paired SO well with the cookie dough, that I then mixed in.
The result, delicious!
Thank you Crumb Boss for inspiring this creation! While I used my own recipes, I highly recommend checking out "Crumb Boss TV" if you want to try these and are looking for a great Vanilla Cake, Swiss style buttercream (Crumb Bosses recipe differs from mine), and eggless cookie dough... I can't wait to try some of the other recipes myself!
I couldn't resist taking some pictures of the cupcakes in these adorable "spider" cupcake stands I picked up at Michael's, I'm going to have to make some Halloween cupcakes just for these!
Alright, I know I've been terrible about my blog posts and youtube videos in the past few months! I apologize and my intention is to be back to posting regularly!
For my first post since my "hiatus" I made a (much requested) tutorial for Gumpaste Hibiscus Flowers. After my post with the Hibiscus Baby Shower Cake I made at the beginning of the summer, I had quite a few people ask if I had or if I could make a tutorial... so viola!
I had to split this into 2 parts because it was too long to upload, but I didn't want to rush or skip past anything. Despite the length of the tutorial these flowers are pretty easy to make and don't require a whole lot of special tools. I do use a Hibiscus cutter, but you can probably use a tear drop, or rose petal cutter and just role out the tapered end to elongate it (as mentioned in the video). All in all, I think this is a good flower for a beginner who wants to make something impressive!
PART 1
PART 2
Supplies I used in this video:
pre-colored gumpaste (hibiscus come in a wide variety of vibrant colors!)
and a jar and piece of foil to create a flower former
*If you are interested in purchasing flower formers like the ones I mentioned in my video, they are called CelFormers and are made by Cel Cakes. You can find them at a specialty cake supplies store or you can find them on Amazon here.
Hey everyone, just a quick post to let you all know about the next Cake Fu webinar! I'm so excited, it's going to be Ron Ben-Israel!! He is my cake idol, so I can't wait to see what he has to say.
His new Food Network show "Sweet Genius" starts tonight as well... I'm some what excited to see it, although it looks like just another competition show that he will be hosting/judging... I'm more interested in seeing him work!
If you aren't familiar with the Cake Fu Webinars, it's a FREE series. They have guests from the cake and sugar art industry share a technique or just talk about themselves. They happen with some regularity, and you can sign up here if you want to register for the webinars!
I made my own vanilla extract! Okay, well, I'm making vanilla extract... and I will be for the next 6 months! It's a long process and I've been meaning to get started for a while now, but I finally did it today.
I started thinking about making my own vanilla when I started sourcing larger quantities of good quality vanilla. The problem with buying in larger quantities is most of the brands aren't available in my local markets, and I've been reluctant to take the risk of spending that kind of money for something (an unknown brand) that I might not like! And I'm a vanilla girl, it's one of my favorite flavors. And I use a lot of it in my recipes... so while I've continued to buy the smaller bottles of my favorite brand (Nielsen Massey) I got to thinking about making my own in large batches.
To make vanilla extract is SO simple (and cost effective), I don't know why it didn't occur to me to do it sooner! You only need 2 ingredients- vodka and vanilla beans!
Vodka
I did a lot of the research on what would be the best to use. While some say that a premium vodka makes a better product, most agree that it doesn't really matter. In fact, the higher the alcohol content the better, and faster the extraction. So, no need to go out and buy expensive vodka for this project. Everclear is a cheap and perfectly acceptable option. I chose to go with Smirnoff, for my first batch I just couldn't bring myself to go with the Everclear! What I used was 80 proof (or 40%)... In order to call vanilla extract "pure" the FDA requires a minimum of 35% alcohol (70 proof) and 13.35 oz of vanilla bean to a gallon of solution. Just something to keep in mind while picking your vodka (and considering how many beans to put in).
Vanilla Beans
The Vanilla Bean is actually the seed pod of an orchid. In order to get the seed pod to develop the orchids must be hand pollinated, and later hand harvested. This explains the cost! The orchid we get the vanilla bean from is native to Mexico, however when sourcing your beans you'll be looking at three different producers, Mexican, Madagascar Bourbon, and Tahitian.
Madagascar Bourbon: These beans seem to be the most commonly available, and most popular. They have a creamy, sweet flavor. The beans are long and slender, are somewhat oily and have a strong (and heavenly) vanilla scent!
Mexican: The second most common beans... They are said to be similar to Madagascar Bourbon beans, but a bit more mellow and have a bit of spicy and "woody" flavor.
Tahitian: I hadn't even heard of Tahitian vanilla until I started my research. From what I read it is more commonly used in larger commercial or "industrial" batch cooking or baking. You can certainly find these beans to make your own small batches of vanilla. These beans are supposed to have a bit of a floral aroma.
I chose to go with the Madagascar Bourbon vanilla beans. While I am intrigued by Mexican vanilla and would really like to try it someday, I decided to stick with what I am used to for this first batch. Regardless of which variety you chose, you should pick beans that have a strong scent, are slightly oily and nice and plump.
You can buy your beans a wide variety of places, I would avoid purchasing them at the grocery store where you might spend $10 for one or two beans! Just do a little research to find a reputable dealer that has a great price. You can sometimes find them at farmers markets but there are a great deal of online retailers. I got mine on amazon.com from JR Mushrooms & Specialties and I think I spent about $12 for 16 beans.
As far as how many beans you need for your extract, again, there were varying opinions about this. Most consistently though, it is suggested to use 3 beans per cup of vodka. As I said, I use a lot of vanilla, so I used a 750ml bottle of vodka which is approximately 3 cups, so I used 12 beans (plus I put in 2 whole beans, I saw on a cooking show the delicious vanilla bean paste scraped out of the pods and I use vanilla beans a lot in my baking).
So, here is my quick slideshow tutorial of how to make vanilla extract!
I am SO looking forward to trying this in 6 months... it's going to be a loooong 6 months, I'll probably start another bottle in a few months so I always have some "brewing."
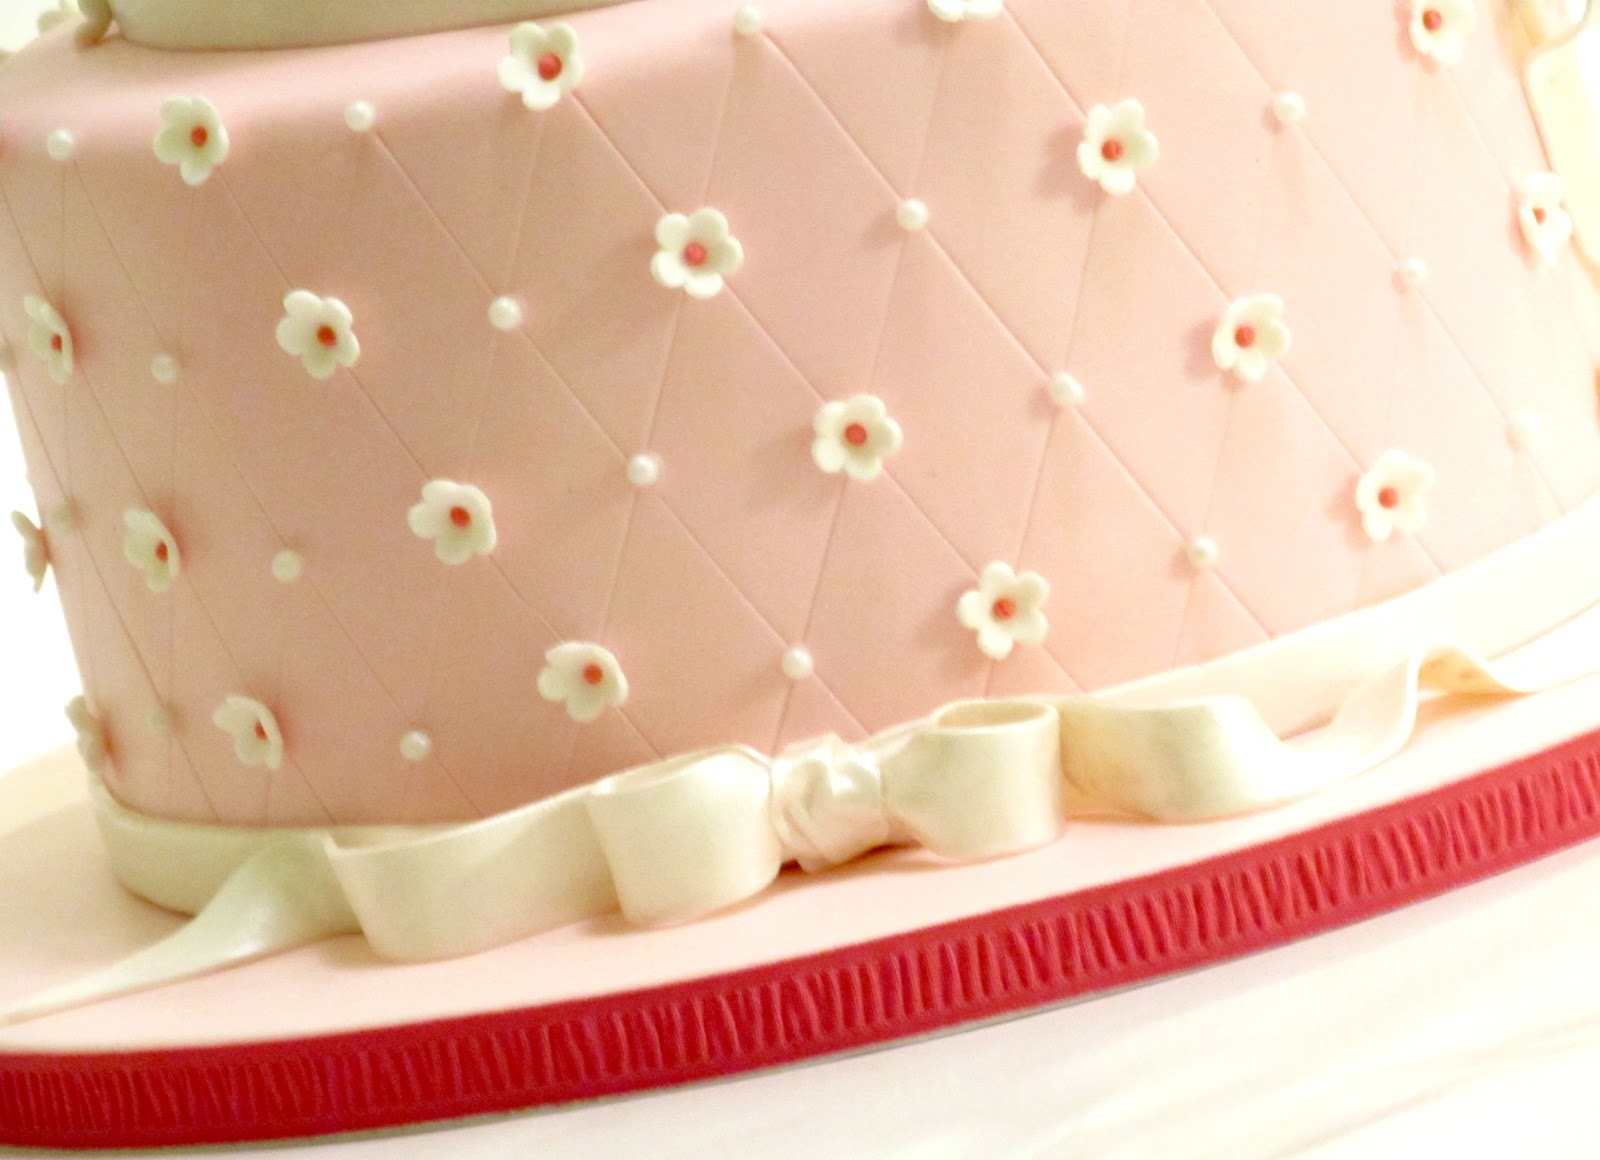
Here is the wedding cake I worked on last week... I love the way it came out! The bride had sent me a picture of a cake she found on The Knot... I'm not sure who the original creator was but this is my rendition of the simple, elegant and classic design!
This was a white almond cake with strawberry buttercream filling and sliced fresh strawberries, and coated with vanilla buttercream. Covered with white fondant and embossed with a quilting pattern and small white sugar pearls at the cross points. Embellished with blue gumpaste sweet peas and the topper the bride purchased! The tiers are 14"-10"-6" So beautiful, so sweet... I am so pleased with this and happy I had the opportunity to create this cake!
If you love this cake topper, it is by Willow Tree and you can purchase it here on Amazon.com or from many other vendors I'm sure :)
I hope you enjoyed looking at these pictures and maybe found some inspiration!
My "Turtle Cake" is one of my most popular. It is one of the first recipes I created when I set out to start a business and wanted to have some "specialty" flavors. The flavor combination (caramel, pecans and chocolate- for those who haven't heard of it) is one of my favorite. It has been since I was a kid and my parents sent me some turtle candies when they were on a vacation in Hawaii.
UPDATE 1/24/2013: If you think this cupcake looks delicious... click below to vote for my entry in the Cupcake Crown (voting starts 1/30/13!)
A few weeks ago, I was going to a get together at my cousin's house and she asked if I could bring a cake... well my time was booked solid, so I didn't have time to make a cake, but I offered to bring some cupcakes. Having recently listened to the latest CakeFu webinar with Wendy Paul, I was inspired to come up with a new and yummy cupcake recipe. I submitted this recipe for the contest they were advertising, but haven't heard anything about the winners yet.... the contest is closed, so I feel that it is safe to share this recipe with you now!
*Don't be scared if you're not a scratch baker, this recipe is adapted from a boxed mix so everyone can try!
In a mixing bowl sift together remaining dry ingredients mix on low for 1-2 minutes to mix the dry ingredients
In a separate bowl (or big measuring cup), combine the wet ingredients (water/coffee, sour cream, vegetable oil, eggs and vanilla), give the mixture a whisk to combine (you'll probably still see some bits of sour cream, but that is OK, you want to mostly combine the ingredients and break up the eggs).
With your mixer running on medium, add the wet ingredients to the dry. Beat on medium for 1-2 minutes until the mixture is combined and will lighten slightly in color. (batter will be on the thick side)
Fill your muffin tins/liners approximately 1/3 full with batter. Put a Turtle Candy in each cupcake liner and fill with more batter on top to about 3/4 full.
Bake approximately 16-18 minutes or until a tooth pick comes out clean when tested (it's OK for some gooey caramel to be on the toothpick, but should not have any raw batter)
Allow cupcakes to cool completely
Cupcake Assembly
Swirl with your favorite Chocolate Buttercream, drizzle with dulce de leche and top with a chocolate dipped toasted pecan!
Tips
If you don't like or can't find Turtle Candies you can substitute any chocolate covered soft caramel candy and either sprinkle in chopped toasted pecans or omit the nuts all together.
This is a VERY sweet cupcakes, I recommend Swiss Meringue Buttercream (recipe here) because it has a lightly sweet flavor compared to American Buttercream, but by all means use your favorite recipe, however I would use Bittersweet chocolate to cut the sweetness some.
You can usually find cans of Dulce De Leche in the international foods aisle of your grocery store (I believe Nestle makes some), but it is really easy to make your own (recipe here)
So, since I made the graduation cake from my last post (specifically the tassel), a gumpaste/clay extruder has been on my "must buy" list. I've been doing a bit of research and was trying to decide between the very popular Makins Model or the Walnut Hollow one that I came across on Amazon. I went to YouTube so see if anyone had compared the models and found this tutorial to make your own!
Because the models I was looking at are $20-$26 I think I will give this a shot before investing the money in a "fancy" one. She mentions in the video that the she spent about $0.99 for most of the pieces, and the others I'm sure are not too much more. The extruder "discs" are Wilton Tips, held on with a coupler... Hey, I've got some of those! I love "Do It Yourself" projects... There is something incredibly satisfying about building, making or fixing something all on your own, and having it work!
So enough of my gushing! I just want to be clear that this is not my tutorial, I wish I was the genius who figured it out, but I am not. The credit must go to GardenOfImagination over at YouTube! Here is the video if you want to check it out for yourself:
I'm hoping to make it to the hardware store this weekend to put one together, if I do (and have time to play with it) I will let you know how it turns out! Oh, and for the "food safety" concerns... The pipe and fittings are for plumbing, a faucet part in fact. If my drinking water can flow through it, I'm guessing it must be food safe - along the lines of PVC used in cake decorating.
So, I promise I have some tutorials and other things coming soon. I finally have a few weeks off before my next big cake... but for now, here is the cake I made over the weekend! It was a graduation cake for a soccer player! The graduate plays goalie, so there are goalie gloves on there and the two logos are for his graduating high school and the school he will be attending in the fall.
The graduation cap is black gumpaste and the tassel I hand rolled the rope/tassel from yellow fondant (with tylose mixed in) and then painted with gold edible dust.
The Soccer Ball is cake too! I used the Wilton Sports Ball pan. I covered the cake with white fondant and then cut out the shapes from white and black fondant so the seams would look realistic.
I piped a goal with royal icing and then in honor of the graduate, the silhouettes are a kicker and a goalie catching a ball (cut out of black gumpaste)
The gloves are rice crispy treats! Covered in fondant with black fondant decorations.
The school logos were painstakingly cut from different colors of fondant... including the letters. Which is why a set of tappits are going on my next cake supply order!
Well, I hope you enjoyed looking at yet another cake of mine!