Thursday, December 19, 2013

Gingerbread Cupcake Recipe!!


Happy Holidays!  Looking for a great recipe to bring to your holiday gatherings?  Today, I wanted to share my recipe for Gingerbread Cupcakes!  It's a delicious holiday treat (also, great for any time you want a gingerbread treat!!).

Ingredients:
-1/4 Cup Unsalted Butter (softened)
-1/2 Cup Dark Brown Sugar
-1 large egg (room temperature)
-1 1/3 Cups All Purpose Flour
-1/2 tsp Baking Powder
-1/2 tsp Baking Soda
-1/4 tsp Salt
-1 tsp Cinnamon
-1 tsp Ground Ginger
-1/2 tsp Nutmeg
-1/4 tsp Allspice
-1/2 Cup Milk (room temperature)
-1/2 Cup Molasses
-1 tsp Vanilla

I topped my cupcakes with cream cheese frosting, with a little orange zest!  So yummy!  I'll have my cream cheese icing recipe coming soon!
Rimmed with sanding sugar and topped with mini gingerbread cookies, these cupcakes are a cute dessert for holiday gatherings, or a sweet gift!

Happy Holiday Caking!

Wednesday, October 30, 2013

Craftsy Flash Sale! (October 30th-31st)

Happy Halloween!!  I know I've been pretty absent from my blog and Facebook lately... I delivered my last cake of the 2013 Wedding Season a few weeks ago and I've been busy celebrating birthdays, tending to family matters, preparing for Halloween and the holidays and just generally being "Mom" for a while!  I've got some tutorials, videos and recipes planned, but those will be a few weeks out.

But, I just heard about the Craftsy Flash Sale going on today and tomorrow in celebration of Halloween and wanted to make sure my readers knew about it!  Be sure to check out the sale for a great deal on some of the wonderful classes offered on Craftsy!

Craftsy

Happy Halloween!

...and Happy Caking :)

Monday, October 7, 2013

Apple Tea Cake Recipe!

Hi Everyone...  Today I am excited to share a recipe, perfect for fall!  Here in New England it has been prime apple picking season...  Pick-your-own is one of my favorite things to do with my son and we try to take advantage of whatever is in season during the summer.  Last week we made it out to the apple orchards to pick a peck of Cortland apples! 
 This recipe has been handed down to me from a family member... I hadn't made it before, but I'm so glad I decided to try it!  Apple Tea Cake, like a coffee cake, is a not-too-sweet crumb cake... perfect for enjoying with a cup of afternoon tea.  It was a huge hit with my family and will probably become a staple through the fall!


Apple Tea Cake Recipe:

  • 4 Lipton Tea Bags
  • 1 Tart Apple
  • 1 ¼  Cups Sugar
  • 2 Cups All Purpose Flour
  • ½ tsp Baking Powder
  • ½ tsp Baking Soda
  • 12 Tbsp Unsalted Butter (softened)
  • 2 Eggs
  • ½ Cup Sour Cream
  • 1 tsp Vanilla
  • Crumb Topping* (recipe to follow)

  1. Preheat oven to 350°F
  2. In a medium bowl, pour 2 cups of boiling water over tea bags, let steep for about 5 minutes.
  3. Remove tea bags, add ¼ cup of sugar and stir to dissolve.  Add peeled, cored and rough chopped apples and let stand about 1 hour.
  4. After an hour, remove apple pieces and set aside.  Also, reserve ¼ cup of tea liquid.
  5. In a small bowl whisk together dry ingredients and set aside.
  6. Add sour cream & vanilla to tea liquid, and stir to combine.
  7. In a large mixing bowl (or in the bowl of your stand mixer) cream together the butter and 1 cup of sugar.  Then, add eggs one at a time.
  8. Next, alternate adding dry & wet ingredients, be careful not to over mix!
  9. Fold in apples with a spatula and then spread into a lightly greased 9” spring form pan.
  10. Evenly spread the crumb topping over the top of the batter, and then bake about 1 hour (or until a toothpick comes out clean) in a 350°F oven.
  11. Let cool completely on a wire rack before removing from pan.
  12. Optional: sprinkle powdered sugar over the top!

 *Crumb Topping Recipe

  • ½ Cup Brown Sugar
  • 1/3 Cup All Purpose Flour
  • ½ tsp Cinnamon
  • 1 Tbsp butter (softened)
  • ½ cup chopped pecans (or walnuts)

  1. In a small bowl, combine all ingredients (except pecans) and blend with a fork until the mixture resembles crumbly, wet sand.  
  2. Stir in nuts.

I hope you will try this recipe... Enjoy!

Happy Caking :)


Thursday, October 3, 2013

Pleats & Brooches Cake!

Here is another of the cakes I did in September!  I was excited to work on this one, I had designed a cake with diagonal pleats some time ago and never had the opportunity to make it.  So, I was thrilled when my bride told me this was what she wanted!
I used a scribing tool to roughly mark out where I wanted the top line of the pleats to go.  I added a little tylose powder to the fondant I used to make the strips with, to stiffen it up and make it easier to work with.  Using my pasta attachment, I rolled strips of fondant to a #4.  I trimmed the fabric strips to roughly 1.5 inches, it didn't need to be exact because the bottom edge would be covered with the pleat below.  I moistened one side and folded the strip in half so the top edge was a nice rolled/finished edge and the bottom was the open seam.  Starting from the top, overlapping my scribed line, I layered the pleats!  When I got to the bottom border of the cake, I used an exacto blade to make everything nice and neat.
The brooches and topper were supplied by the bride.  I love the sparkle they added to this otherwise "simple" looking design.  It's hard to capture the sparkle of the "bling" in these photos!!
Thanks for looking!

Happy Caking :)


Tuesday, September 24, 2013

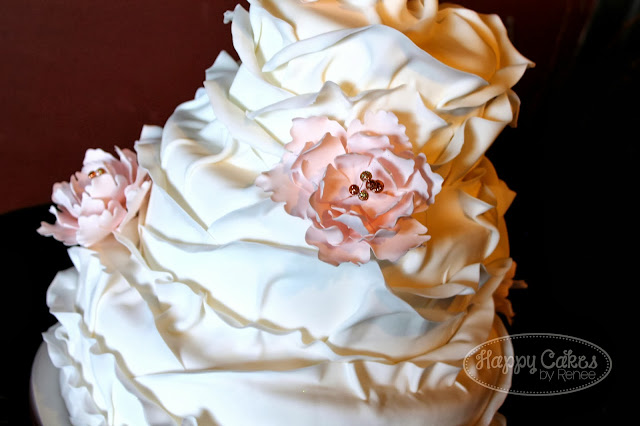
Ruffled Petal Cake!

I made this cake a few weeks ago, for a wedding at the gorgeous Saltwater Farm Vineyard in Stonington, CT.
When I was discussing the design with the couple, they were in love with a cake by Cinderellas Cakes... check out the fun, "shabby chic" styled bridal shower she created the cake for: here.
My take is very similar... But, I tried to keep the ruffles a little thinner, so they would look like fabric or flower petals pealing away from the cake.

I loved the fashion flowers on the original cake, so I styled my own after them.  The centers are just balls of gumpaste, on wire, coated with copper and gold disco dust.  I used a peony cutter and left the petals un-textured, and fairly un-ruffled to give a nice contrast to the pleated and folding fondant on the cake.  They almost look like paper flowers!
So pretty and romantic!  I brought the ruffles up over the edge of each cake, so it looks like one piece, with out any seems.
The cake was set up on a rustic wine barrel, and later had some fresh flowers arranged at the base.  So beautiful, this cake was definitely one of my favorites from the season!

I am making a list of ideas for my next video tutorials... if anyone would like to see a demonstration of the technique I used, leave a comment below!

Happy Caking :)

Monday, September 23, 2013

Cake in Transit!

I am finally winding down from the busiest wedding season I've experienced yet!  I am behind sharing my cakes with you all... And I really wanted to get some photos posted today, but even without cakes to work on, there don't seem to be enough hours in a day!

I WILL get some photos up this week... but today, I just wanted to let you all know about a product I have up for sale!

Several weeks ago, I posted this photo on my Facebook page as I was getting ready to leave for a delivery.
It's a magnet that I created at the beginning of the summer... I was sick of the frustration I felt when driving slow and cautiously with a cake on board.  I'm sure you've all experienced it, going super slow around a corner, on a one lane street... breaking for bumps and slowly going around pot holes.  Or being on the highway and in the SLOW vehicle lane, and being tailgated, when the person behind you could safely pass if they wanted to!  Ugh, it was so frustrating and I felt like yelling out the window, "How would you want me to drive if this was YOUR wedding cake?!"

So, I created this design and got myself a magnet for my car.  It says "back off," while still being lighthearted with the fun font :)  And, I have to say, it has made a HUGE difference in my experience for cake deliveries! People tend to stay far back, or politely pass me if they can.  No more evil stares and tailgating (well almost none).  I would use this for any cake delivery, but I feel  like people are more likely to be understanding if it's a "wedding" cake, so I chose my wording with that in mind.

It really is great, and I get lots of people passing me, smiling and waiving, or trying to peak in the window to see if they can catch a glimpse (they can't, I box all of my cakes for delivery).  And, I have a magnet with my business name on the side of my vehicle, so it's a little marketing too!

Anyway... this was a long way of saying... people liked my magnet!  People said, they wanted one!  I know, I searched the web to see if I could find one before making my own.  I only found a few and they weren't the image I wanted to portray so I made this.  And, since I like it and so many of my followers liked it... I decided to find a source for fulfillment!  
I am happy to announce that I've just posted this design for sale!  You can buy it here or by clicking the "Shop" tab above or on my Facebook page!  If you order one, I'd love to hear what you think!  Does it ease the pressure during cake transportation?!

Happy Caking :)

Wednesday, September 4, 2013

Cinderella Shoe Tutorial, Live on SugarEd Productions!!

Drum roll please.....

My much sought after isomalt Glass Slipper tutorial is now available!  After I posted pictures of the Cinderella Sweet 16 Cake I made back in March I was contacted many times about the instructions.  And, I promised a tutorial would be forth coming...

 Well, in the spring I was contacted by Sharon Zambito (yeah... I know, crazy cool, right?!) about a new online sugar arts school she was launching this summer.  She wanted to know if I was interested in being a contributor and would I put together my glass slipper tutorial for her.  Umm, YES!  Of course I would!!
 

It took me some time to fit it into my schedule, but I was able to get the instructions to Sharon over the summer... And guess what, SugarEd Productions is now open and my tutorial is featured on the homepage this week!  I am so excited, I literally squealed when I saw she posted the link on Facebook to my tutorial!! (hence my over-use of exclamation points in this post, lol)


SugarEd Productions, Online Sugar Arts School is a member only site chock full of awesome tutorials, recipes and videos.  There is also an inspirational member gallery and a great community developing on the forums.  I joined several weeks ago and I have been busy exploring the site in my free time (mostly between the hours of 2am and 3am, lol!).
New content is added weekly!

Here are just a few of the exceptional features waiting for you: 


  • library of high definition video tutorials 
  • photo tutorial library
  • huge printable recipe bank  business, photography and decorating articles 
  • member tutorials and recipes 
  • member photo gallery 
  • professional advice and message forums (chat with Sharon Zambito and other members)
  • games, contests and other interactive activities 
  • valuable resources 
  • special SugarEd store discounts for members only 
 
And, as if the phenomenal instruction by Sharon isn't enough, she even has celebrity guest instructors!

I am loving the content, and I know you all will too!  If it's by Sharon Zambito, you know it will be superb, quality content!  I am absolutely stunned and amazed that she asked little old me to be a contributor.  I am SO excited to see my tutorial up, and glad to finally be able to share with all of you, who have patiently waited for me to get this together!

Go sign up for SugarEd Productions, Online Cake School to see my Glass Slipper Tutorial and many others!!

Happy Caking :)

Thursday, August 22, 2013

Craftsy Photography Classes!

A photo can make or break the presentation of a product.  As cake decorators... as artists, it is incredibly important for us to have great photos of our cakes.  But, it's highly unlikely to have access for a photographer to stop by and take photos for each creation.  If it's a wedding cake, you can often get a picture from the photographer at the event.  However, they are there to document the day for your couple... not necessarily to take a great photo to sell your product.  Don't get me wrong, I love seeing pictures of my cakes done by the "pro's."  

But, only I know what angles I want, what new technique I tried or detail I want to highlight.  I am by no means a great photographer... I learn by trial and error (and of course YouTube!).  Here is a picture of one of my early cakes and my early photography skills:
Eeek! I cringe to look at it!  The wrinkles sheet, the dramatic shadows and sun streaks (and not it a good way), the corner where the sheet didn't fit the background.  This is NOT a good photo!  At least it wasn't in my kitchen with dirty dishes in the background!  The poor photo distracts from the really cool cake... I really liked this cake, but the photos are so bad I don't want to have them on my website or facebook page and certainly not printed for my portfolio!

A few years and a few lessons later and here is another photo I took of a cake:
This may not be the greatest photo, but this one is printed and proudly displayed in my portfolio, posted on my website and facebook... I think I even used it for some marketing materials.  To me the difference is drastic and this photo can help me sell my skills and product, where the photo above looks sloppy and unprofessional!

All this to say...  You don't have to be a pro photographer... but you should know how to take a "good" photo of your cake.  Craftsy (which you probably already know I love) has several photography classes to help you do just that!  I had no idea!!  Click the banner below to see what they offer.


At the very least, I think the  Shoot It: Product Photography Class would be a great investment.  I certainly plan to purchase it, when wedding season finally winds down!  I'll be sure to let you all know what I thought of it :)

Happy Caking :)
DISCLAIMER: This post contains affiliate links, however all opinions expressed are my own.

Monday, August 5, 2013

Combed Buttercream Cake

I delivered this sweet and simple wedding cake over the weekend...
Simple combed Swiss Meringue Buttercream accented with fresh flowers!  I always get nervous when delivering "naked" cakes, because I won't know what the finished cake is going to look like until I'm at the venue... The florist did the flower arranging for me and I think this collaborative effort turned out beautifully!
 
Sometime simple can be so elegant... Thanks for looking!!

Happy Caking :)

Tuesday, July 30, 2013

How I learned to decorate cakes...

Recently, I received an email from someone asking how I learned to decorate cakes (specifically asking if I learned everything from Craftsy) and if I had any advice.  My response turned fairly epic, because I wanted to be thorough... so I decided there might be other readers looking for advice!  So below is my response!

I've been baking all of my life.  My mom never baked, so I taught myself out of her cookbooks, and we had a friend of the family who liked to bake so I baked with her a lot.  When I was little I would make cakes for my family member's birthdays and decorated them with the start tipped-type patterns (press a cookie cutter into the frosting and fill in with little stars)... when I got a little older I found a recipe for marshmallow fondant, learned how to make it and would decorate cakes with simple cut-outs...  When my cousin got pregnant, her sister asked me to make the shower cake "with her" and it was a pregnant belly cake.  It was the biggest project I'd done and it came out pretty good!  That's when my cousin suggested I take my cake making a little more seriously.

I did a lot of research online, home with an infant, I had a lot of time on my hands!  There are some great resources- Cake Central, YouTube... they were my most valuable resources at first.  Craftsy has only been around for about a year and a half- maybe two years now... so yes, I was already experienced with cake decorating before I took any Craftsy classes.  I've taken the classes to learn specific techniques, or just to see how some of the cake decorators I admire do things.  I think there are some great classes for beginners... even if you don't want/need to make the entire cake they demonstrate you can take away specific techniques you will use over and over again.
If you want to get into cake decorating my recommendations are:
  1. If you are not already a baker, learn to bake!  When I started decorating I used boxed mixes, you can look up "WASC" recipe for a great "doctored" recipe.  However, they changed their formulas and when I started my business I had to think about labels... I didn't want to list a bunch of weird ingredients and chemicals, so I researched, experimented and came up with my scratch recipes.  Either way, it's up to you, but you should have something reliable that tastes great!
  2.  Learn to get smooth buttercream...  there are videos on YouTube (I have one for how to smooth Swiss Meringue Buttercream) and tutorials all over the internet.  But, you should find a technique that suits your icing recipe and practice until you have it perfected.  It's one of the things that will make the biggest difference in your finished cake.  You can have a cake embellished beautifully, but if the "canvas" behind it is bumpy and lumpy there is nothing you can do to hide it.  Of course, it takes time to be able to get that perfect finish, but it's important to learn it and not rush past it to other decorating techniques.  Even if you are going to cover the cake with fondant, you need smooth buttercream because fondant will only enhance imperfections in the buttercream finish.
  3. If you want to make fondant cakes, learn to cover a cake with fondant!  And learn to smooth it properly.... again, it takes time and practice to learn.
  4.  Once you can get a nice smooth buttercream and/or fondant surface then expand on to other techniques...
  • Craftsy: I wouldn't bother with Craftsy until you can do that, they don't really teach it.  You can take a free class called "Modern Buttercream" that will teach you to make a recipe for Swiss Meringue Buttercream and teach some simple decorating tips...  Or a "Basic Fondant Techniques" class.  These would be a great way to get an idea of what Craftsy is all about. They also have some great free recipes posted!
  • Cake Central:  Cake Central has been an invaluable resource for me.  They have tons of free recipe posted, with user reviews so you can decide which ones to try.  Galleries with beautiful cakes for inspiration.  But, probably most valuable are the forums....  There are threads upon threads with tips for cake decorating.  Check out some of the "stickies" in the "How do I?" forum, for plenty of links to online tutorials.
  • YouTube: I joke with my family that you can become a surgeon from YouTube.  It is a wealth of information for just about anything you want to learn!  Even before I found Cake Central I was watching YouTube videos about cake decorating.  It's my first stop for anything I don't know how to do (and not just cake decorating, changing a headlight, plumbing problems, carpentry projects, etc...)
  • Pinterest:  When I started we didn't have Pinterest, but now I think it would be really useful.  People all over "pin" ideas and tutorials for cake decorating.
  • Books & Videos:  My library didn't have a huge selection, but a lot of others do.  Look up any book you can about cake decorating and absorb the knowledge! "The Cake Bible" by Rose Levy Beranbaum is probably one of the most famous and most thorough resources for learning to bake.  As far as recipe books, I'm a huge fan of "Cake Love" by Warren Brown.  Sharon Zambito, owner of Sugar Ed Productions produces some really great quality instructional videos.  I have not seen them, but many decorators swear by them!
  • Online Memberships:  Popping up all over are membership websites that give you access to tips, tutorials and recipes.  My Cake School is probably one of the longest running ones, and I've seen many new and innovative techniques come from there.  And coming soon, maybe even up already is Sharon Zambito's new cake school SugarEd Productions Sugar Art School (I will definitely be signing up!!).
  • Experimentation:  Don't be afraid to experiment... a lot of the techniques I learned, I had to figure out on my own.  That's how this field stays new and refreshing.  Most of the time you will design cakes with different applications of the same techniques... but then someone will want to achieve something new and new technique is born.  One of the things I'm most proud of is my Cinderella Slipper... I really wanted it to be sugar so it wold look like glass... but I had never worked with isomalt before and I couldn't find any tutorials.  So I experimented!  And it worked... I was even asked to make the tutorial for SugarEd Productions (Sharon emailed me herself!).
  • In Person Classes:  A lot of the "masters" travel all over to teach.  There are ICES conventions, seminars at cake shows, and even just private classes offered all over.  Find a "master" you admire and check out their website to see if they will be instructing anywhere near you.  There are also the Wilton classes offered at most crafts stores.  I've never taken one, but if you need to learn the basics, a lot of cake decorators start there.
If, after practice, you think you want to make your hobby a business.  First do your market research and put together a business plan so you will be fully prepared and know if you have a market for your products.  Then you will need to look into your local rules and regulations.  Some areas have cottage food laws that allow you to produce from your home.  Some areas require you to find a separate commercial kitchen to work from.  When you're ready reach out to your local health department to find out what you need to do.

And "is it a big investment?"  Well, that's tough... it depends on how far/involved you want to get.  Does it cost ME a lot... honestly, yes.   I'm still a new business and there are still lots of tools I don't have.  It CAN be very costly.  But, a lot of us do our best to utilize what we already have when designing cakes.  You can start small, especially if you are just a hobby baker.  Get a set of pans, some spatulas, a turn table and some pastry tips.  I didn't start out with the large collection of tools I have, but I buy new things as I need them.  Making custom cakes is not cheap, that is why it costs so much.  Ingredients aren't cheap, tools aren't cheap and most importantly the time we put into learning and decorating isn't cheap!  That's probably not what you were hoping to hear, but so many people don't realize the costs and time involved in making cakes.  I don't mean to scare you off... if you are just starting out and learning the basics it won't cost you much.  But, if you ever set out to make cake decorating a legitimate business, be prepared that there is some investment.  On top of all of your tools, ingredients and your time you have your license fees, business insurance and overhead.  I rent my kitchen by the hour, but even if you are able to bake from home under cottage food law you have added costs for electricity, gas, water, etc...

Well, I hope that gives you an idea of how I got here, and where to start if you want to get into cake decorating!

Happy Caking :)

Wednesday, July 24, 2013

Lace Applique Cake

Today, I have another cake from my photo shoot with Allure Bridals, to share!

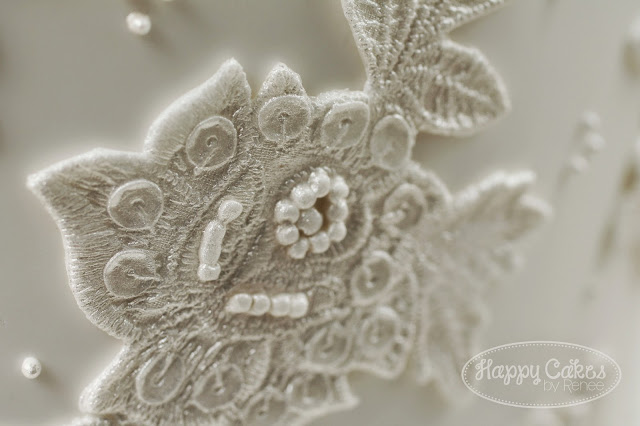
For this "story" I was sent a photo of a pretty lace covered green bridesmaid dress.  I've been wanting to make a lace embellished cake for a while now, so I knew lace that would be the focus of my design!
 Now, I just had to find the right lace to use!  I ordered a few from cake supply stores, but they weren't "real" enough looking.  I considered doing a brushed embroidery lace design... but knew I didn't have the time.  So, that only left me with one options... to make my own lace mold.
 
Off to the fabric store to find some lace...  In my area of New Hampshire we don't have a lot of big fabric stores...  On one of my trips back to my home state of Connecticut I stopped in to a giant Joann-Fabrics and searched the entire store until I found a small display of lace appliques!  I finally found something I thought would work!!

To make the mold, I used a technique similar to one I saw in the Craftsy class Cake Design Made Simple: The Wedding Dress with Rachel Teufel.  But, I modified the process a little so I had more of a mold instead of just a lace press.... either way, it still meant hours of hand cutting around each applique!!
The inspiration dresses were more structured and less flowy... so I added a structured pleated band around one of the top tiers.  I was tempted to add a bow... because I think everything is pretty with a bow... But, thought it wouldn't fit with the look I was after.
Fresh flowers were added to the top when the photographed this cake... but I wasn't there for the 2nd day of this 2 day photo shoot, so I don't have pictures.  Rest assured, I will definitely share the finished photos when they are published!
 Thanks for checking out my work!  Take a look at the gorgeous table that my friend, Meena of 5th Avenue Weddings & Events created for this story!


I know... amazing, right?  If you need a fantastic and creative wedding coordinator, look her up!  She's in the New York area, but she travels!!

Happy Caking :)