Well, I'm back from my trip to Florida and finally getting back to the swing of things! I posted the pictures for my
70's Birthday Cake in a hurry before I left, but I wanted to share how I did a few things on that cake. This post is a tutorial for the Disco Ball cake topper I made. I used Rice Cereal Treats to form the ball so it wouldn't be so heavy sitting on top of the cake, and I also wanted to make sure the ball would hold it's shape. I used Disco Dust for the first time to give it it's shimmery sparkle and I LOVE the stuff! You can buy Disco Dust from
Global Sugar Art or your local cake supply store. So, here are the instructions if you want to try this cake topper for yourself!
First make your "mirror" tiles so they can dry thoroughly before assembling the disco ball.
 |
| Roll out a small amount of gray fondant on a lightly dusted surface (I used a piece of acrylic I got from the hardware store so I don't cut my table later!) |
 |
| Trim the sides so you have an even square/rectangle with straight sides |
 |
| Brush your entire fondant piece with gum glue (you can probably get away with using water, but I used gum glue so my disco dust would adhere well) |
 |
| Work quickly to dust the entire surface with disco dust (I used Hologram silver) |
 |
| When your surface is thoroughly coated let is sit a few minutes so the gum glue dries and the fondant hardens a bit, it's easier to cut that way |
 |
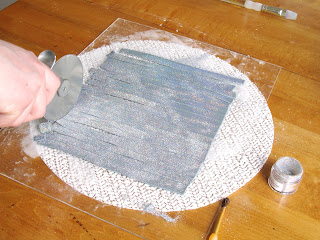
| Cut across one way with a wheel/pizza cutter (I suggest measuring first, I didn't and my tiles weren't as even as I would have liked) |
 |
| Then cut across the other way (again, measuring would be a GREAT idea!) |
 |
| Lay out your tiles on a flat surface to dry completely |
Make your Disco Ball out of Rice Cereal
 |
| Make your rice cereal treats, just used the recipe on the box (you can half or quarter the recipe to make an approximately 4" ball) |
 |
| Form the Rice Cereal Treats into a ball, mine was about 4-5 inches |
 |
| Use a lollipop or cookie pop stick up through the bottom, this will help to stabilize it while working on your Disco Ball and will help attach it to the cake later |
 |
| Poke a hole in the bottom of an upside-down plastic or styrofoam cup and use it as a base for your Cereal Treat Ball. I let my ball dry for a day so it was hardened and easier to work with |
 |
| Roll out a piece of gray fondant, the same color as you used for the mirror tiles |
 |
| Coat your cereal treat ball to adhere the fondant. I used piping gel, you could used royal icing, shortening or buttercream as well |
 |
| Lay your fondant over the ball |
 |
| Smooth as best you can, but the majority of the surface will be covered by the mirror tiles so a few lumps or bumps are OK |
 |
| Since I was attaching fondant to fondant I just used water as glue |
 |
| Stagger the tiles a bit and just place them around the ball, use a pair of sharp scissors, if necessary, to trim the dried tiles to fit |
That's it! Let your ball dry a day or two so the tiles don't move around on you when you place your Disco Ball on your cake. The disco dust is so sparkly, it's a really neat effect! Have fun :)
Happy Caking :)


I love this!! How did you make the silhouettes? I love those, too!!
ReplyDelete@Dawn Thank you! The silhouettes were really easy... I Googled "Disco Dancer Images" and found a picture with the dancers on it. I just cut them out and used them as templates to cut the silhouettes out of black fondant. Then I coated the figures with black Disco Dust after the dried :)
ReplyDeleteJust got a request for a "club cake" for a sweet-16 party. Can't get too out of control with the theme at this age, so this is exactly what I was thinking off, some sparkly stars and silhouette dancers. I was going to just buy a disco ball cake topper and Googled it only to find this! So glad I did, now I can make everything that's going on her cake. Thanks!
ReplyDelete